Improper Stone Veneer Installation Practices

Matthew Steger, ACI • April 5, 2024

Adhered Masonry Stone Veneer (also known as AMSV) is a product used on many newer (say, the past 30 years or so) homes in our area, although it is rarely properly installed based upon my experience. I’ve inspected lots of newly constructed homes for buyers just in the past 5 years and have not seen a proper AMSV installation yet.


In 2009, guidelines from the Masonry Veneer Manufacturers Association (MVMA) were introduced. Prior to that, only manufacturer installation guidelines really existed and those were often confusing to some installers, builders, home inspectors, and code officials. These guidelines were used to create a document considered the standard for AMSV installation, called ASTM C1780: Standard Practice for Installation Methods for Adhered Manufactured Stone Masonry Veneer.  Homes with stone veneer installed that were built prior to this time frame will generally only have the items shown below if they were repaired or otherwise modified later on after installation.


This ASTM document outlines how this product should be installed and includes many (48, to be exact) helpful diagrams to use as reference to show many different situations and locations on a home’s exterior where this product is to be installed.


Adhered Masonry Stone Veneer is often installed along the lower portion of a home’s front exterior (such as below another type of siding) or sometimes is installed to cover the entire front (or more) of a home. Sometimes the product is only installed over the exposed foundation and another siding product serves as the home’s exterior cladding from the sill plate upwards.


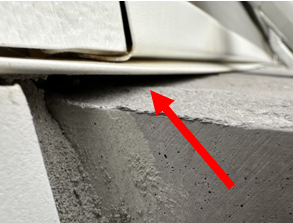
I’ve inspected nearly 80 homes in a new development in the area and repeatedly call out the same flaws for each home. In this case, it commonly relates to the lack of sealant below a piece of metal flashing that is installed where vinyl siding terminates on top of a stone ledge. The stone ledge serves as the top of the stone veneer (a transition, if you will) installed below it

In this very common example shown to the left, the red arrow is pointing to the underside of a piece of metal flashing that runs upwards a short distance (out of view) behind the vinyl siding and then is bent outwards to extend out laterally across the top of the stone ledge. 


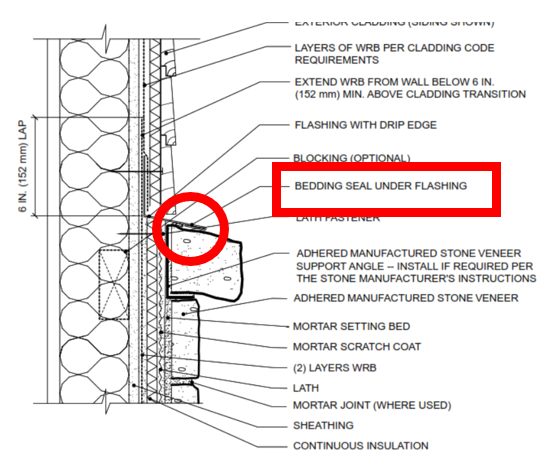
The flashing is meant to help catch any water than may get behind the lower end of the siding and area around the stone ledge. Figures 3, 8a, and 8b of ASTM C1780 each show a bead of sealant to be installed along the underside of this flashing, yet it is almost never done. I’ve included figure 8b of C1780 below to illustrate how this detail is supposed to be done. Notice the items in red.

These proper flashing and sealant details are important in order to help prevent water entry into an exterior wall where hidden rot and mold (and/or insect infestation) can then occur unbeknownst to the homeowner for a period of time.


C1780 Figure 8b illustrates the need to apply the “bedding sealant under flashing”. It means, properly caulk the underside of this flashing which sits on top of the ledge.

This sealant is supposed to be installed to help prevent wind-driven rain from entering behind the stone veneer at this location. I either use a screw driver or my finger to check this area. For whatever reason, most builders do not perform this detail as required.


I’ve actually asked a few builders about this in the past. Each time, the reply was along the lines of ‘we’re hoping that the house wrap behind the veneer will catch and shed the water’.


I’ve also asked a code official who was doing a final inspection on a brand new home as I was performing the buyer’s home inspection. His reply was that he was ‘not too familiar with the requirements’ and that ‘it’s up to the product manufacturer to tell the builder how to install the product’. The lack of following proper guidelines and the lack of knowledge of the installers and code officials is a good re-enforcement of why buyers of even brand new homes should always get their new home inspection performed.


Another related issue that I run across pertaining to AMSV deals with how these products are terminated along grade, roofs, windows/doors, and flat hard surfaces. Improper installation at these areas can prevent proper drainage from the AMSV and can allow for the absorption of water into the exterior wall structure.

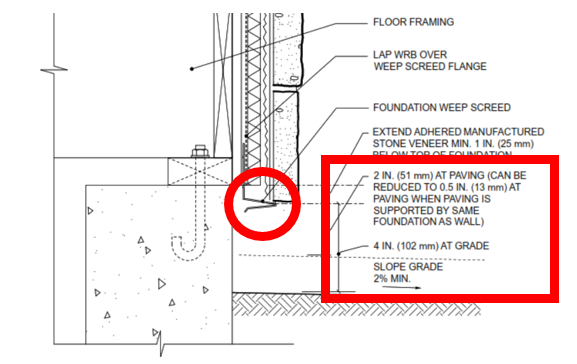
C1780 Figure 5b shows that stone veneer should terminate, at least, 2” above hard flat surfaces (ie, driveways, steps, or patios) and, at least, 4” above grade. There is a weep screed (normally a plastic piece with small holes in it) shown in the red circle installed which hangs down below the veneer to allow water to drain out that may have penetrated behind the veneer. The weep screed’s openings need to be fully open to atmosphere and should not be buried in soil or mulch or caulked.


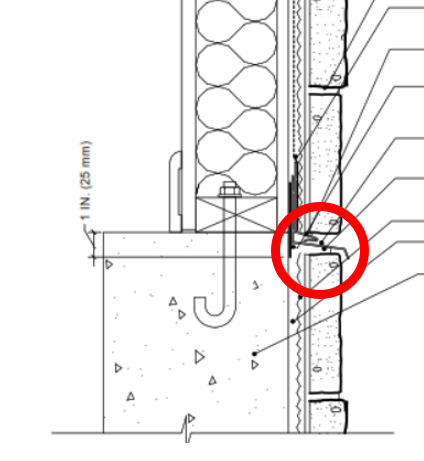
Figure 7 of C1780 shows an example of where the veneer is extended down onto the foundation. The weep screed would still be installed above grade (see its location in the red circle) and the veneer continues below the weep screed.


The veneer below the screed is not installed against wood structure but only against the foundation wall.


780 Figure 17a

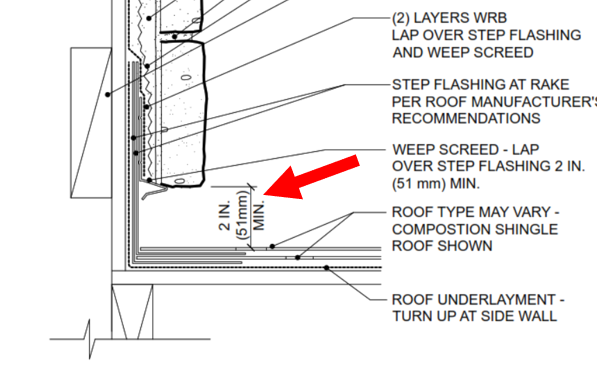
In cases where there is veneer on a sidewall above a roof, a gap of, at least, 2” should exist above the roof. This gap helps allow water to drain out of the screed and also makes future roof replacement easier. A weep screed can be seen hanging down below the veneer for drainage.


Note - Manufacturers of composite siding and stucco products also call for, at least, a 2” gap in this location. At homes with wood siding, I often find the siding installed directly against roof shingles and the lower edge of the siding often has chipping paint and/or rot due to the installation method.


C1780 Figure 22

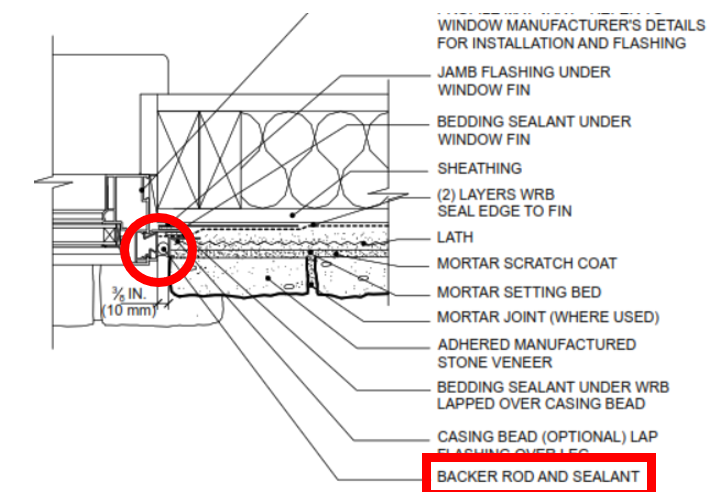
This detail covers where AMSV terminates at things like doors, windows, or other vertical joints like another wall. This diagram looks rather cluttered due to all of the components and details needed. This view is looking downwards into the exterior wall (home’s interior is at the top and exterior is at the bottom). 


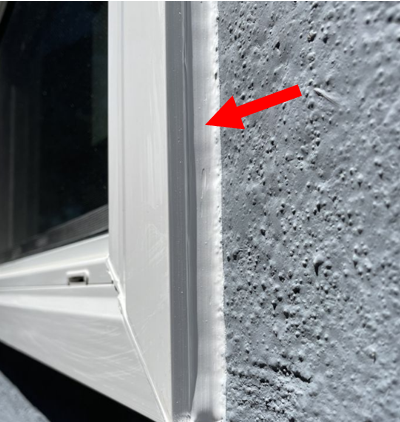
A 3/8” perimeter gap is supposed to exist at these junctions where backer rod is installed (see red circle) and then the opening is properly sealed with an elastomeric sealant. These gaps with backer rod installed give room for expansion/contraction of the materials (the masonry and the door or window) and the sealant is meant to prevent water entry yet remain flexible. For doors and windows, the gap should exist around the entire perimeter where the AMSV contacts the window or door. Mortar should not be installed tightly right against a door or window. The photo below shows an example of a properly sealed joint where stucco joins a window; the detail is the same for stucco, brick, or stone. The sealant used is semi-flexible and does not harden like regular caulking.


(photo courtesy of AK Windows)


Another concern is where things penetrate through the AMSV such as receptacle boxes, faucets (aka hose bibs or hydrants), clothes dryer vents, etc. 


These items should be pushed into a bead of flexible sealant (elastomeric) instead of being cemented into place within the veneer. Doing so helps prevent water entry into (and possible rotting of) the adjacent wall as well as easy repair if any of these items need to be replaced in the future.


-Copyright © Improper Stone Veneer Installation Practices, Matthew Steger, ACI,  2024. All Rights Reserved.


Facts, opinions and information expressed in the Blog represent the work of the author and are believed to be accurate, but are not guaranteed. The Lancaster County Association of Realtors is not liable for any potential errors, omissions or outdated information. If errors are noted within a post, please notify the Association. Posts represent the author's opinion and are not necessarily the opinion of the Association.

Enhanced Title Insurance: More Protection for Your Home
By Wayne Angelo, Cross Country Mortgage and Bill Stull, Abstract Associates of Lancaster August 17, 2026
When purchasing a home, buyers often have the option of choosing either a standard or enhanced owner’s title insurance policy. Both policies protect the buyer’s ownership interest in the property, but the enhanced policy provides several valuable protections that go beyond the coverage included in a standard policy. The enhanced policy is available for purchases of one-to-four-family residences and condominiums when the property is being purchased in an individual’s name, rather than in the name of an LLC, corporation, partnership, or other entity. A standard owner’s policy protects against common title problems, including defects, liens or claims against the property, an unmarketable title, and a lack of legal access. The enhanced policy includes those protections while adding coverage for issues that are especially relevant to homeowners, including certain building permit and zoning violations, improper subdivisions, vehicular access problems, and structures that encroach onto the property after the buyer takes ownership. One of the most important added benefits is post-policy forgery protection. A standard policy generally protects against title issues that existed before the buyer purchased the property. The enhanced policy also provides protection if someone later forges the homeowner’s signature or creates a fraudulent deed that clouds the homeowner’s title. With real estate and identity fraud becoming an increasing concern, this protection alone can provide homeowners with valuable peace of mind. The enhanced policy also includes an automatic increase in coverage. The policy amount increases by 10% each year during the first five years of ownership, up to 150% of the original policy amount. This helps the coverage keep pace as the value of the property increases. In Pennsylvania, the enhanced policy is available for a one-time premium that is only 10% higher than the standard owner’s policy premium, with no annual renewal cost. At Abstract Associates, we believe buyers should understand the difference between the two policies before making their decision. For a relatively small additional cost at settlement, the enhanced policy provides broader protection that can continue to benefit the homeowner long after closing.

Top 10 Things People Don’t Understand About Property Insurance
By Raquelle Riti, Bernieri Associates Allstate Insurance August 3, 2026
Top 10 Things People Don’t Understand About Property Insurance
Reverse Mortgage
By Wayne Angelo & Megan Brogna – CrossCountry Mortgage July 31, 2026
Most people think of a reverse mortgage as a way for homeowners to access the equity they've built in their current home. While that's certainly true, many Realtors are surprised to learn that a reverse mortgage can also be used to purchase a new home. What Is a Reverse Mortgage? A reverse mortgage, also known as a Home Equity Conversion Mortgage (HECM), is an FHA-insured loan available to homeowners age 62 and older. Instead of making monthly mortgage payments, eligible borrowers can use a portion of their home's equity to eliminate an existing mortgage, establish a line of credit, receive monthly payments, or simply improve cash flow. Borrowers remain responsible for paying property taxes, homeowners' insurance, maintaining the home, and continuing to occupy it as their primary residence. What Is a Reverse Mortgage for Purchase? A HECM for Purchase allows qualified buyers age 55 and older to purchase a new primary residence using a substantial down payment and a reverse mortgage—without the obligation of monthly principal and interest payments.* This program can be an excellent solution for: Buyers looking to downsize. Retirees relocating closer to family. Homeowners moving into a 55+ community. Clients seeking a home that better fits their retirement lifestyle. Buyers who want to preserve more of their retirement savings or investment assets. Instead of paying all cash for a home, buyers can finance part of the purchase through a reverse mortgage, allowing them to keep more of their liquid assets available for future needs. Why Realtors Should Know About This Program A Reverse Mortgage for Purchase can help clients: Increase purchasing power. Improve monthly cash flow. Preserve retirement savings. Purchase a home that better meets their long-term needs. Age in place more comfortably. For many older buyers, this financing option can make the difference between settling for a home and purchasing the one that truly fits their retirement goals. If you work with clients who are 55 or older, a Reverse Mortgage for Purchase may be worth exploring before they write an offer. *Borrowers must continue to pay property taxes, homeowners insurance, maintain the property, and occupy the home as their primary residence. The amount available depends on factors including the youngest borrower's age, current interest rates, and the home's value. Facts, opinions and information expressed in the Blog represent the work of the author and are believed to be accurate but are not guaranteed. The Lancaster County Association of Realtors is not liable for any potential errors, omissions or outdated information. If errors are noted within a post, please notify the Association. Posts represent the author's opinion and are not necessarily the opinion of the Association.
Mid Year Check In Realtor Calendar
By Missy Boots – Realty One Group Unlimited July 17, 2026
Whew! If you're anything like me, you blinked and somehow July is already halfway over. That also means we've officially crossed the halfway mark of the year. How’s business treating you? Maybe your year is right on track; if so - congrats! If you're holding your breath waiting for your transaction numbers to suddenly align with the goals you set in January, it's time to stop waiting and start resetting. It’s never too late! The beauty of this business is that January doesn't have a monopoly on fresh starts. In real estate, momentum can change surprisingly quickly. One listing can become three referrals. One conversation can lead to a transaction. The second half of the year has the potential to look completely different from the first. The key isn't wishing for a better year. It's changing what you do next. One of the most important mindset shifts an agent can make is to treat their business like a business. Business owners don't simply hope for better results. They create a plan, track meaningful metrics, review what's working, and adjust when needed. Your real estate business deserves the same level of intention. When you start thinking like the CEO of your business instead of just the salesperson in it, your daily decisions begin to change, and so do your results. So where to start? Ask yourself: How many meaningful conversations am I having each week? How consistently am I following up with past clients and leads? Am I asking for referrals? Am I visible in my community and online? Am I blocking time every day for lead generation? Many of us focus on results we can't control: closings, commission checks, or contracts signed. Instead, focus on the activities that create those results. Results lag behind consistent action. If you improve the actions, the numbers usually follow. Choose one or two meaningful goals for the next 3 months. Then identify the handful of weekly actions that move those goals forward. For example: Reach out to 5 people a day. Schedule three coffee meetings with your sphere. Host one open house every weekend. Post valuable content three times a week. Write five handwritten notes every Friday. Consistency beats intensity every time. Your calendar tells the truth. Look back at the last two weeks. How much time was spent on activities that directly grow your business? Admin work is necessary, but revenue producing activities deserve protected time on your calendar. While time blocking is considered a “bad” word to many, being in control of your time allows you to control your business. Schedule lead generation before you schedule anything else. Pick an accountability partner and share your weekly action plan with each other. Commit to checking in regularly and holding one another accountable for following through. Celebrate the wins along the way. When you accomplish the actions you set out to complete, reward yourself, even if it’s just an iced coffee with your accountability partner. Above all, don’t let a negative mind set deter you from forward momentum. Start small. Do the work. Finish big. Here’s to a successful 2026! "Success looks a lot like failure up until the moment you break through the finish line." – Dan Waldschmid “Today is always the most productive day of your week." – Mark Hunter
Home inspection guidance for REALTORS® helping buyers navigate inspection results, set expectations
By Ernest Homer, Homer Inspection Services June 19, 2026
Learn how REALTORS® can guide buyers through the home inspection process, manage expectations, address concerns, and keep transactions moving toward closing.
VA loan benefits and financing options for veterans, active-duty service members
By Dan Ranck, Mortgage Loan Officer June 5, 2026
Learn how VA loans work, their benefits for eligible homebuyers, and why REALTORS® and sellers shouldn’t fear offers that use VA financing.